Thursday, June 12, 2014

my favorite photo editing apps


I have a *real* camera but I use my iphone for almost all of my photos anyway. It's just easier - it's always with me, and since my cats tend to be my subject 90% of the time (okay, 99%) it's most convenient to grab my phone and quickly shoot whatever adorable thing they're doing. For blog photos I usually end up lightening them up in photoshop on my computer, but for instagram I like to edit right on my phone. I have an arsenal of (what I think are) pretty awesome photo editing apps that help make my pictures bright, sunny and beautiful! Here are my favorites --


Afterlight has been my go-to for the last year or more. It has controls for adjusting things like saturation, contrast, exposure, shadows, fill light, etc. The ones that I tend to fiddle with the most are brightness and exposure, and then I'll usually bring down the contrast a bit, too. This also has tools for straightening crooked pictures, adding white bars to non-square pictures so they'll fit in instagram and tons of really pretty filters (with opacity adjustment, yay.)


One of the first photo editing apps I ever downloaded was Photoshop Express and.. it kind of stunk. I was expecting it to be the best one ever because, well, Photoshop! A couple weeks ago I decided to try it out again and they've definitely updated the app. The exposure control on is KILLER. It comes with some nice filters, too, but you can't adjust opacity so I think that makes them kind of useless. For me this app is totally all about the exposure. I swear it brightens SO well without washing out colors, something I sometimes have a problem with in Afterlight (and even real Photoshop!)


Genius is my outfit posting buddy. I open the Genius app and stick it on self timer with a ten second repeat. It beeps to count down the seconds, and then takes a picture every ten seconds & saves it to the camera roll. Sometimes I use a camera remote but this is usually a lot easier and I'm just used to it now. It has other timed settings (you don't have to choose 10 seconds) and some other nifty features too but it's, by far, the best self timer app I've tried.


A Beautiful Mess is the only app I use for adding things like borders, images or text. In Afterlight you can add white bars to the sides of non-square photos, but I don't like posting them to Instagram that way. I need color! So whenever I have a picture that's formatted like that, I add a pink scalloped border with this app (example). I love that every embellishment has a bunch of color options and the ability to resize, change opacity and rotate. Plus the app designers are sweet and kind of super awesome.


For collage purposes, Diptic is definitely my favoite. I actually use this a lot for personal photos, just to compare pictures -- like if I try on a couple outfits for a trip I'll take photos & put them all in a Diptic to see them at a glance & decide which ones I like best. My favorite feature about this app is that you can delete the borders, so your entire image is just filled with photos. You can also keep the borders if you want, and resize them to be thick or thin. I think you can even change the color, but I love when they're borderless myself. And there are SO many layout options. Like a crazy amount.


Last but not least is Retouch. I can't count how many times one of my cats has done something SO cute but there's a bobby pin laying on the floor right next to their head. Or a picture of my workspace is done-in by a pencil smear on my table. Little details like that might not be noticeable to everyone else but YOU see them and can't see anything else, you know? Anyway, I get rid of tiny imperfections with Retouch. It's kind of like the content aware function in Photoshop except honestly I think it works even better.

And that's it! If you want to see my iphone-edited-photos you can always take a peek at my instagram ;)

Tuesday, January 29, 2013

lost and found memories


We've had undeveloped disposable cameras and rolls of film laying around the house for as long as I can remember... some in junk drawers, some on shelves in the laundry room, some under the bed. Most of them expired 10+ years ago and might be completely useless now, but I'm finally going to find out! I was originally going to get them all developed at once, but after searching tirelessly for a very cheap way to develop disposable cameras (to no avail) I decided I'm going to start getting one developed per week. I actually like this way better! It will be something really nice to look forward to each weekend. I've heard of people getting old film developed and just having minor aging issues so I'm hoping I have the same luck!

I'm really excited to hopefully discover some lost memories! I'll post about my progress here if I find any photographic treasures. Who knows how many forgotten places, friends and adventures are waiting to be rediscovered! :)

Friday, October 26, 2012

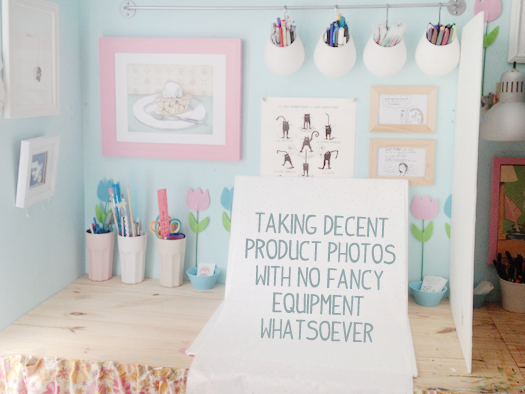
Taking decent product photos with no fancy equipment whatsoever


As a shop owner, I often have to take photos of my products to list online. I like to do this without any fancy equipment whatsoever -- I don't even have a camera. Seriously. 

I thought I'd share how I do it, in case anyone else is interested, or intimidated by suggestions that say you need super expensive DSLR cameras and lightboxes and reflectors, etc. Now obviously my photos aren't quite as amazing as the ones taken by people who DO have all those things. But I think I manage pretty well with what I have, and I'm usually pleased with the results of my photo shoots.

To take my pictures I use: an iphone, two 20x30 pieces of foam board from the dollar store, masking tape, 1/4 yard of fabric from JoAnn's, and mid-morning sunlight. Optional: tin foil.


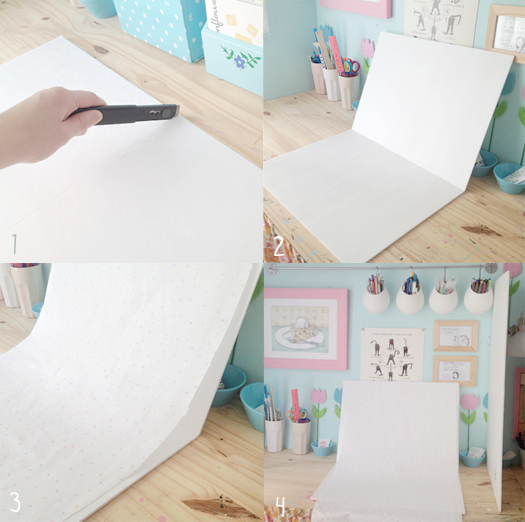
1. Score the back of the foam board so that you can bend it in half. You don't want to go all the way through and cut it, just score it so that it folds evenly. 2. Prop the foam board on a table that's facing a window. Don't use any artificial lighting. I usually take pictures somewhere between 10am-12pm. In the summer the good light lasts a little longer but at this time of year the shadows start getting very harsh not long after noon. 3. Tape your fabric to the top of the board, and pull it to the end so that it creates a seamless background. You don't want it to fall into the crease in the foam board. 4. Prop up another piece of white foam board next to the backdrop, facing your light source. This will help bounce the light back and reflect any shadows on the other side of your product.

In my home we have a giant window on the other side of the house, so light comes into my room from both sides. But if you don't have any light source on the other side, you might want to try covering the foam board with tin foil to better reflect the light. When it's positioned at the perfect angle (adjusting it will help you figure out what angle is best) it really works wonders at softening up harsh shadows!


Here's an example of a photo I took with this backdrop, lightened a tad in Photoshop. Like I said, the results obviously aren't as good as they'd be if you *do* have lots of fancy equipment, but I think they're not too shabby either :)

ps. The dinosaur brooch is available in my shop!

Monday, August 22, 2011

pitter patter go the raindrops


If I had known that New Jersey now has its own monsoon season, I would have taken some back-up outfit photos! gee whiz, it has not stopped raining here in days and I sort of forget what the sun looks like. I already feel a bit amateur doing indoor outfit posts to begin with, so I couldn't bring myself to post ones that were taken in pitch darkness with flash :p I also got some fantastic new flapper doodle products in the mail on Friday and haven't had a chance to photograph them for my shop since the weather has been so dreary. Mother nature always seems to plan these massive rainstorms for days when I desperately want to use my camera!

In other news, I went jeans shopping on Friday for the first time in about two years. I don't wear jeans very often, but I really felt like I needed a new pair since my olds ones were a bit loose. Turns out, I'm two sizes smaller now! :D Woo hoo! I haven't been this size since high school, about 8 years ago, so I'm over-the-moon with glee! I'm not on weight watchers anymore, but I think cutting back on grapefruit juice and drinking more water in its place has done me a world of good. I know it's fruit, but grapefruit juice still packs a load of calories when you're consuming about a bottle a day (eek!)

ps. I have a little interview up on The Girl with the Blue Bow today! Check it out here :-)

Saturday, March 19, 2011

outfit photo, circa 1991


My mom found a bunch of old photos today, and I couldn't help but post this one! The dress I'm wearing was my favorite when I was little... my mom saved it for special occasions like pre-school graduation, Easter and birthdays. She called it my "posh frock" which is where I got the name for posh frock fridays :) My parents took so many photos of me modeling my clothes, I'm tempted to do a bunch of old outfit posts. Some of my dresses were so cute I wish they still fit me! ;-D

Monday, March 7, 2011

what goes around comes around


dress - forever 21
sweater - forever 21
tights - we love colors
shoes - aldo

The last time I wore this dress was back in August for my third outfit post. I went back to look at it today after I took these photos, and I was shocked at how much I've changed in the last several months! My style & the way I shoot my photos has evolved, but it's mostly my hair, which has gone from being waist-length, and dark brown to shoulder length bright red, that's the most obvious difference. And honestly, as far as superficial changes go, it's the best decision I ever made. My hair has always annoyed me. I tried dark brown, light brown, blonde, black, you name it. But I never tried red until last year, and it just fits. I really never want to dye it any other color, ever again. I think I should have been born with this color, it just feels so right. :)

Sunday, January 9, 2011

and the snow snow snow came down down down


coat - diane von furstenberg
leggings - old navy
boots - f21

Yesterday I begged my brother to go with me to the park and take photos in the snow, so I could recreate the Catherine Deneuve photo I had as my blog header for the last month or so. I've had the idea in my head for a week or two, and I've just been waiting for it to snow again. Thank goodness my parents talked him into going (he hates doing anything for me unless I bribe him in some way) so I got my photos :D I swear, if he wasn't so difficult about spending 10 minutes with me, I'd ask him to take all my photos, but my mac photo booth is much more patient and I don't have to give it Wendys Spicy Chicken Combos to take my picture ;-)

When we had the snowstorm a couple weeks ago I was shocked how many bloggers took photos outside (it's so COLD!!) but now I totally understand why. These are, by far, my favorite photos I've ever posted on my blog. There's something magical about snow. It's so quiet and peaceful. Despite its cool temperatures, just looking at it in these photos makes me sigh and feel all warm inside :)

Friday, December 10, 2010

stockings, not of the fireplace variety


I love love love tights and stockings! Colorful, patterned, seamed and plain old black. And this time of year, when the temperature is hovering around freezing, they are the difference between having icicles for legs or just being chilly.

I have tons of them, in almost every color I can think of, but the one kind I'm missing (and really really want) are sweater tights .. the cable knit design just screams "warm and toasty" to me! Not sure where to find them though.. I've looked all over the place and the only ones I found (at Kmart of all places) were just plain black. I really want gray or brown or maybe cream... suggestions are very welcome! :)


^ that was an outtake when my self timer went off before I was ready, but I think it looks pretty cool! :)

Friday, November 26, 2010

dream list #1


My dream list is comprised of things that I will not be getting for Christmas. My parents' budget for me and my brother is $100, so a $135 camera is not going to show up under our tree, lol. But nevertheless I love window shopping online, and I'm bound to come across some pretty awesome stuff that I desperately want but either can't afford or don't want to buy because it would just be unnecessary clutter when we're downsizing to move -- so I'm sharing those things with you :)

This camera is just beyond amazing! It's called the Spinner 360', and although I first saw it on Fred Flare, it's actually cheaper on Amazon (of course.) I've become a lot more interested in photography since I got my own point and shoot last year, and yet the more I use it, the more I long for the good old days of film and unexpected shots. As a kid I always loved the excitement of going to pick up our processed photos. And now when I look through our old photos, the candid ones that we shot on real film are always much more endearing and interesting than the ones that we had to set up 8 times before finally getting the perfect shot on our digital cameras. This particular camera, I think, would be a nice first step back into the world of film. It's not a conventional 35mm, so my shots wouldn't even be remotely simliar to the ones I'd be taking with my digital camera. And I think that the panoramic ratio makes you feel like you're back in the moment when you look at the photo.

Ok, I actually better stop there.. I need to stop talking myself into buying this! That wasn't the point ;-D

ps. the lovely tape clipart is from Pugly Pixel